My New Bread Knife Is Here!

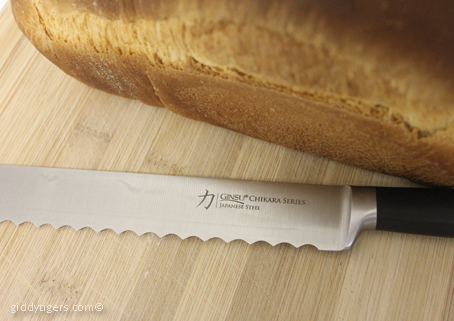
Finally, after baking loaves and loaves of bread at home, and trying my best to attain a uniformed loaf of sliced bread with our smallish serrated steak knife, the bread knife we’d ordered arrived last week!

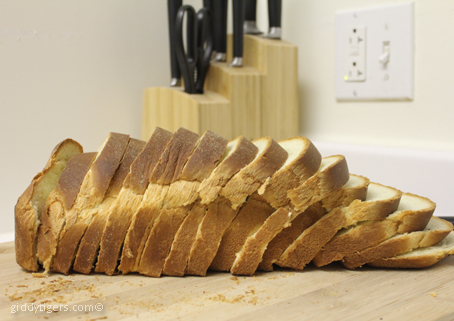
With the steak knife, it was difficult to get a good slice through, because the knife was too short.  Our bread knife here is long enough to efficiently slice through the loaf of bread producing gorgeous slices.

I’d read that in order to get beautiful slices of bread, a bread knife that has serrated edges is an absolute must.  Also, when slicing, a sawing motion is to be used.  And lastly, you need to wait till the loaf has completely cooled down before slicing.

Slice of bread, anyone? 😀

Posted in Close to Heart & Home, Drooling & Cooking | Tagged , , , | Leave a comment

Spring Has Sprung

Spring is definitely upon us.  Instead of snow, we have intermittent rainy days.  Instead of the cold wind, we have the warm sunshine.  I should be able to strut around in my tank tops and shorts now.

Change is inevitable.  Some people may resist change while others welcome it with open arms, but change is definitely essential to move on.  The change from cold to warm.  The change from boring to bright and interesting.

I was reminded of this when I saw the drab colors of winter transform into the most beautiful canvas of spring.  Colors are making their presence seen everywhere, and I can’t stop admiring them every single day.  I’m sure I won’t be able to see them this way in Malaysia.

This right here is one of my favorite trees.  Look how cheerful the colors are.  It makes me automatically smile when I look at it.

I’m gonna miss all these gorgeous spring colors in less than two months, when we will be making our trip back home to Malaysia.

It’s yet another important change in our lives.  We leave behind a wonderful trail: seven months of experiences in New England, and bring along memories to cherish forever.  It’s scary yet exciting.

But change is always like that, is it not?

Posted in Thoughts & Scribblings | Tagged , | Leave a comment

Pizza Dough Perfected

I had previously posted about my homemade pizza.  While it was edible, we found the pizza dough very hard, chewy and not as good as we had hoped it would be.  I then read about my friend’s experiment with making pizza, and she recommended a pizza dough recipe, which was adapted from Bobby Flay’s recipe.  Everyone who tried making pizza dough from this recipe achieved successful results.  It looked easy enough to make and I was tempted.

I knew I had to try it.

Oh, plus…I wanted to try what pizza with artichoke hearts tasted like. Hehehe…

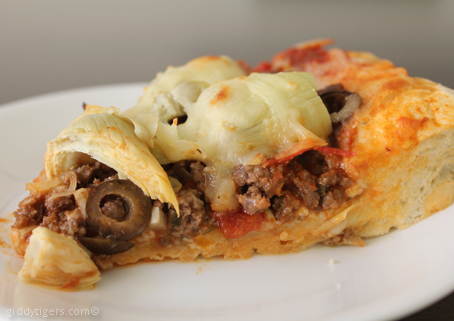
It was also the first time I made pizza with ground beef and turkey pepperoni 🙂

Well, on the whole, the pizza turned out really, really well.  The crust was not hard and chewy at all.  Instead it was a joy to bite into and it tasted extremely good with the toppings.  Of course, you can put whatever toppings you want on it.

I will definitely use this pizza dough recipe in future.

Pizza Dough (Yields 2 12-14inch pizza crusts)

Ingredients

  • 3½ to 4 cups bread flour, plus more for rolling (Chef’s Note: Using bread flour will give you a much crisper crust. If you can’t find bread flour, you can substitute it with all-purpose flour which will give you a chewier crust.)
  • 1 teaspoon sugar
  • 1 envelope instant dry yeast (which is about 2 tsps)
  • 2 teaspoons salt
  • 1½ cups water, 110 degrees F
  • 2 tablespoons olive oil, plus 2 teaspoons

Directions

  1. Combine the bread flour, sugar, yeast and kosher salt in the bowl of a stand mixer and combine. While the mixer is running, add the water and 2 tablespoons of the oil and beat until the dough forms into a ball. If the dough is sticky, add additional flour, 1 tablespoon at a time, until the dough comes together in a solid ball. If the dough is too dry, add additional water, 1 tablespoon at a time. Scrape the dough onto a lightly floured surface and gently knead into a smooth, firm ball.
  2. Grease a large bowl with the remaining 2 teaspoons olive oil, add the dough, cover the bowl with plastic wrap and put it in a warm area to let it double in size, about 1 hour.
  3. Turn the dough out onto a lightly floured surface and divide it into 2 equal pieces. Cover each with a clean kitchen towel or plastic wrap and let them rest for 10 minutes.
  4. Using fingers, roll and shape the dough out into a flattened piece of dough, which will be your pizza crust.  Add your toppings, and bake according to your preferred pizza recipe.
Posted in Drooling & Cooking | Tagged , , , , | Leave a comment

Stuck On the Dymo LetraTag Label Maker

My life is a never-ending quest of getting things organized, especially so now that I have two super-active kids who are running around every single day and creating “creative messes” everywhere they go.  My third one will no doubt soon be contributing to this creativity, so I need to be on guard. 🙂

Getting organized means not just knowing where things are stored, but also making them candy-sweet to the eye.

I’ve always loved labeling items: jars of food, items in the pantry, folders, boxes…but I have thus far used the old-fashioned method of writing the labels on small pieces of paper, cutting them out and then using sticky tape to adhere them to the surfaces that needed labeling.

Not long ago I was introduced to the concept of a label maker.  What you do is to type in the words you want and then print out the label onto strips of paper, all precut!  I’d seen them all over the internet and was already making mental notes on how I’d be able to put one of these babies to good use.

Well, the closest I got to a label maker was one of those label punchers, which I remember were from Dymo.  My daughter has a Dymo label affixed on her water tumbler, like so…

Hence it was with sheer joy when I was recently given the opportunity to experiment with this fantastic label maker from Dymo too: the Dymo LetraTag® Plus LT-100T.

Ain’t it a beauty?  I simply love the classy colors and shape.  Although it’s not a handheld type of label maker, and I can’t hold it with one hand when using it, it has a QWERTY keyboard, so typing out labels is pretty simple, much like typing on a keyboard.  My son actually thought it was a giant calculator when he saw it on my desk.

Continue reading

Posted in Thoughts & Scribblings | Tagged , , , , , , , , , | 1 Comment

A French Cuisine Experiment With Creamy Honey Dijon Chicken

As far as possible, I try to cook one new dish weekly.  My requirements are only that it needs to be easy to prepare and that it’s delicious.

I believe this Creamy Honey Dijon Chicken dish fulfills these 🙂 … I adapted it from the original recipe, omitting some ingredients which I did not have in my pantry.  What I love about this dish is that it is incredibly easy to prepare, tastes lovely with steamed rice, and oooh…did I mention that it’s French? 🙂

My hubby remarked that the chicken meat was a little too tough, so I’d need to remember not to cook it for too long next time.  Alternatively, I could also use chicken thigh fillets.  Surprisingly my kids tried it too and while they did not say they hated it, they were not bowled over by it.  I will be giving it to them again. 🙂

According to the recipe which I adapted this dish from, this creamy delicious dish goes well with absolutely anything you can think of.  I served it with steamed rice but you could also try toasted bread, buns, mashed potatoes, pasta….you get the drift.

I gave my dish a twist by adding some baby spinach to it, for the added color (and also because that makes it a complete dish on its own).

Creamy Honey Dijon Chicken with Spinach
Yields 4 servings

Ingredients:

  • 4 pieces of chicken breast tenders (left whole, or sliced in cubes)
  • 2 garlic cloves, minced
  • 250 ml cream
  • 2 tsp Dijon mustard + 1 tsp wholegrain mustard (I used 3 tsp Honey Dijon mustard instead)
  • Juice from ½ lemon
  • Salt & Pepper to taste
  • Handful of baby spinach
  • Olive oil for frying

Directions:

  1. Heat 2 tbsp olive oil in a large frying pan and fry the chicken until cooked through and browned. Remove from the pan and set aside.
  2. Fry the garlic until fragrant and softened (about 2 minutes).  Be sure not to burn the garlic!
  3. Add the cream and mustards and allow to simmer and reduce for 3 minutes.
  4. Add lemon juice and place the chicken back into the sauce.
  5. Season to taste.
  6. Before serving, add the spinach and stir for about 30 seconds, or just until spinach turns soft, but not overcooked.
  7. Serve hot.
Posted in Drooling & Cooking | Tagged , , , , , , , | Leave a comment