So apparently the creator of this recipe utilised five thousand dollars (I’m assuming RMB) to obtain this supposedly super soft and super fluffy buns that are to die for. I tried a tweaked version a few months ago, but it wasn’t that good, perhaps because I didn’t use cake flour. There are several versions of this recipe on the internet, but all of them are quite similar in nature.
Anyway, I had promised my kids I would make chocolate-filling buns for them, so I decided to give this 5K recipe a go.
This recipe has several steps that can be broken up into several sessions, so I was able to do it, even though I had kids and baby with me. The first step involved a starter dough, presumably to kick start the fermentation process. Some people leave this starter dough overnight in the fridge, but I used warm water and left it out on my counter top. It took about 2-3 hours before the dough achieved the “honeycomb” look.

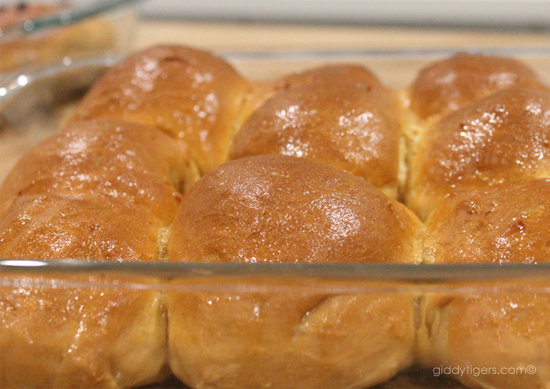
The buns I made were slightly brown because I used molassess instead of white sugar. As usual, the whole house smelled heavenly when the buns were baking in the oven, and they looked absolutely beautiful!

The buns were indeed soft and fluffy, and knowing me, they taste awesome with butter!

As promised, half of the batch of buns were filled with chocolate. I used 3 chocolate buttons, i.e. the kind that are used for tempering chocolate. I suppose you could use cooking chocolate too, but you will need to chop it into pieces. Don’t use chocolate chips for the filling because they can’t really melt. I only use chocolate chips on the top of the buns, just so we could tell the chocolate buns from the plain ones.


I’m happy to note too that these buns remain soft for a couple of days after baking. I would recommend finishing them within 2 days for guaranteed freshness though, but I doubt you will have trouble doing that, given that these are really yummy!
Five Thousand Dollar Buns (adapted from My Baking Cottage)
(Yields: about 24 regular-sized buns)
Starter Dough: Ingredients
- 210g Bread Flour (High Protein Flour)
- 90g Cake Flour (Low Protein Flour)
- 24g Caster Sugar (I substituted with molasses)
- 6g Instant Dry Yeast
- 240g Water (I used warm water to speed up fermentation)
Directions
- Mix all ingredients for the starter dough, cover with cling wrap and leave to proof until it resembles a honeycomb. If left in the fridge, you can leave it overnight, otherwise if left on the countertop, it will take about 2-3 hours to proof.
Bread Dough: Ingredients
- 210g Bread Flour
- 90g Cake Flour
- 96g Caster Sugar
- 1½ tsp Salt
- 24g Milk Powder (I simply used milk powder from sachet samples because we don’t drink milk powder…haha)
- 90g Egg (about 2 medium sized eggs; whisk each egg separately and weigh)
- 54g Water
- 72g Unsalted Butter (Room Temperature)
- 10g melted butter for brushing after the bread is done
Directions
- Mix all ingredients from bread dough (excluding 72g butter) to the starter dough and knead till it’s not sticky (I had to add a little more bread flour in order to achieve the correct texture, so just estimate as you go along)
- Add butter and knead till “windowpane stage”. (I usually just knead till the dough clears the bottom of my Kitchen Aid bowl)
- Place dough in bowl and cover with cling wrap. Let dough proof till double in size (about 1 hour).
- Punch out the air and without resting, divide the dough into the number of portions you would like.
- Dust with a little bit of flour if necessary, shape the dough and put into greased baking pan for 2nd proofing.
- Bake in preheated oven of 180℃ for 30 mins
- Apply melted butter the moment it’s out of the oven for that shine!


 Little Miracles
 Our Journey of Love